Immich Access With Cloudflare One
I love Immich. It's an open-source project I fell in love with as soon as I tried it for the first time in early 2023. Finally, someone in the self-hosting world understands how to present your photos in a beautiful way while staying usable for the non-techies in our lives. Immich is fast, has mobile apps for Android and iOS, and includes object detection and machine learning features. It lets all those photos you stored over the years come to life.

I quickly decided to join the project, and the team was very welcoming even though I had a lot to learn about js/ts. After getting a few PRs merged I was invited to become a contributor and I'm happy to say I have been chipping away at it in my spare time ever since.
Since Immich is a self-hosted application, you need a way to connect to it even when you're not at home. But remember: you are storing your private photos and videos in it and so you want it to be secure. At the same time, it should remain fast and easy to use, otherwise you won't use it every day. This balance is not always easy to strike, and there are some pitfalls unique to Immich that I'll discuss below.
In my opinion, the method I'm presenting in this article is the ultimate way of accessing Immich, yet I can't find it documented anywhere else. It is fast, it is secure, and it works even if your ISP uses CGNAT or dynamic public IP addressing. It does require more setup upfront, but that is a one-time job and makes it very easy to enroll new devices and let them upload photos as well as large videos. This means not only you, but your partner, kids, or relatives can enjoy all features of Immich no matter where they are.
Disclosure: I work at Cloudflare, but the views expressed in this post are entirely my own and do not represent the views or positions of my employer nor the views and positions of the Immich project. The Cloudflare-based solutions described here are ones I genuinely use myself; I am not compensated for recommending them, and nothing in this post should be read as official product guidance. You should weigh all of this context when reading my recommendations. All technical information was accurate at the time of writing and may change.
System requirements
This article is focused on accessing an existing Immich install. If you need help setting up Immich for the first time, there are excellent docs for that on the Immich site as well as countless video guides on YouTube.
I will assume that your Immich instance is reachable on http://192.168.1.10:2283 and that you are using the recommended docker compose install method. You will also want a domain in order for TLS to work, and I'll assume that to be yourdomain.com with a subdomain immich.yourdomain.com for Immich.
At the time of writing (May 2026), the latest version of Immich is 2.7.5.
Reviewing existing solutions
We'll spend some time reviewing existing solutions for accessing Immich and compare the advantages and disadvantages of each. This will lead up to the Cloudflare solution I have in mind and how it stands out over the rest for self-hosting a complex application like Immich.
Option 1: Plain HTTP to Docker
When you set up Immich it will be reachable on port 2283, accessible over plain HTTP. As mentioned, I will assume that it is accessible at http://192.168.1.10:2283 from your web browser or in the Immich mobile app.
Pros:
- Zero extra setup, no device enrolment
- Fast, limited only by your LAN speed and server performance
- No upload size limitation for Immich
- No exposure to the internet which is great for security
- Open source, free forever
- Self-hosted, no dependency on any third-party service
Cons:
- No TLS. Even though you are on your home network you should really set up TLS for confidentiality and server authentication.
- Completely inaccessible away from home
Bottom line: You will only really use this when you are testing out Immich for the first time.
Option 2: Local Reverse Proxy
The plain HTTP port is not enough, and I really encourage you to set up a local reverse proxy in front of it. This lets you easily deploy TLS certificates when you use your domain name and Let's Encrypt. Oh, and Cloudflare is often a good choice for managing your domain name as well! When you have pointed your domain to 192.168.1.10, Immich will be reachable at https://immich.yourdomain.com when you are on your local network.
It is beyond the scope of this article to document exactly how to set up a local reverse proxy and TLS certificates, but there are several excellent options like nginx, caddy, traefik etc. I'm sure your AI agent and YouTube will help you out.
Remember that you need to configure the reverse proxy correctly to allow very large POST requests, otherwise your large video files will fail to back up to Immich. This is called foreshadowing.
Pros:
- Gives Immich a clean URL like
https://immich.yourdomain.com - Easy setup, no device enrolment
- TLS certificates are handled by the reverse proxy, providing server authentication as well as secure, encrypted communication between server and client
- No upload size limitation for Immich if correctly configured
- Lets you centralize headers, auth, rate-limits, and logging at the reverse proxy
- Open source, free forever
- Self-hosted, no dependency on any third-party service
Cons:
- Still only reachable from your local network
- Certificate management is your own responsibility
Bottom line: Putting a reverse proxy in front of Immich is a no-brainer, and we'll use it in our ultimate setup as well.
Option 3: Reverse Proxy with Port Forwarding (⚠️ Strongly Discouraged ⚠️)
If you search for reverse proxy deployment guides online, beware. Often they follow up the guide by telling you to serve your application by opening a port on your router to allow external access. Suddenly, you can connect to Immich from anywhere!
Pros:
- Complete access to Immich wherever you are
- No device enrolment needed, just connect to the URL
- Fast, only limited by your ISP speed
- No upload size limitation for Immich
- Open source, free forever
- Self-hosted, no dependency on any third-party service
Cons:
- Your server is directly exposed to the public internet. This is a major security risk
- Likely not possible if your ISP uses CGNAT
- Your ISP likely uses dynamic public IPs, so you'll need a DDNS service
- You are responsible for TLS certificate management and hardening.
Bottom line: As a security professional, take my advice and don't open up Immich like this. In the past, exposing your apps to the Internet like this was fine but those days are far gone.
People have argued with me on this, saying "Immich needs a password to log in, so exposing it is fine!" It is not. This login page is not a strong security boundary unless hardened correctly, and you are likely not a security engineer monitoring your systems well enough to respond to attacks. Immich is a complex application with a large attack surface, and it is possible that a misconfiguration or (god forbid) future Immich vulnerability could allow an attacker to bypass authentication entirely. On top of that, password brute-forcing and dictionary attacks are a thing...do you and every other user on your Immich server really have a strong, unique password? Please don't end up on Shodan.
Option 4: WireGuard VPN
OK, let's not expose Immich directly to the Internet. What other options are there?
WireGuard is a modern, lightweight VPN protocol built into the Linux kernel. It is highly secure and achieves high performance. You run a WireGuard server and connect your devices to it, and for Immich you will be using it together with the aforementioned local reverse proxy.
Pros:
- Excellent performance: minimal overhead, modern cryptography
- Open source, free forever
- Very popular and well-documented, plenty of guides on how to set it up
- Only one UDP port exposed via port forward, and WireGuard has a well-audited, minimal attack surface
- Virtually impossible to brute-force the key authentication, especially when using an optional PSK
- If configured with a full subnet in
AllowedIPs, your phone sees the whole home network, which can be useful beyond Immich - Self-hosted, no dependency on any third-party service
Cons:
- More upfront setup: key management, config file distribution
- More ongoing maintenance: every device must be enrolled which is pretty complex
- Does require decent technical skill
- Still needs a local reverse proxy, you need to manage TLS certificates yourself
- Likely not possible if your ISP uses CGNAT
- No built-in identity or policy layer; access control is limited to
AllowedIPsand manual firewall rules
Bottom line: This is an excellent way of accessing Immich. While quite tedious to manage in the long run, WireGuard is very secure and fast.
Option 5: Tailscale
Tailscale is a managed VPN service built on top of WireGuard. It handles key exchange, NAT traversal, and device management for you through a coordination server that Tailscale operates. No port forwarding is required; Tailscale punches through NAT using STUN and DERP relay servers. Unlike WireGuard, Tailscale can manage a domain name and TLS certificate for you, so a local reverse proxy is not needed. Tailscale even has an official video guide on setting up remote access for Immich:
We also need to discuss licensing: Tailscale is free for personal use, but limited to 6 users and 100 devices.
Free tier limitations:
- 6 users
- 100 devices
- Personal use only
- Business/admin features are limited compared to paid plans
Pros:
- Remarkably easy setup
- Easy to enroll new devices
- Wide device support including Windows, macOS, Linux, iOS, and Android
- No port forwarding required
- End-to-end WireGuard encryption means Tailscale's coordination server never sees your traffic
- No local reverse proxy needed, can manage TLS certificates
- Support for Access Control Lists (ACLs) that let you limit what parts of the network devices can access
- Works through CGNAT
- MagicDNS gives your server a stable hostname automatically without needing a domain name
Cons:
- Not self-hosted: depends on external service
- Every device outside of home must be enrolled, though this is much easier than on WireGuard
- Free tier limitation of 6 users can be a limiting factor, paid plans available. Update: While writing this article, Tailscale increased their limit from 3 to 6 users making this con much less noticeable
- Not fully open-source
Bottom line: An excellent option if you have up to 6 users and want minimum hassle.
Option 6: Cloudflare Tunnel
Both WireGuard and Tailscale are solid options. Tailscale in particular has strong access control capabilities with its ACL system. However, both require a client on every device, and neither gives you a browser-accessible URL that anyone can use without installing software. This is where Cloudflare Tunnel comes in.
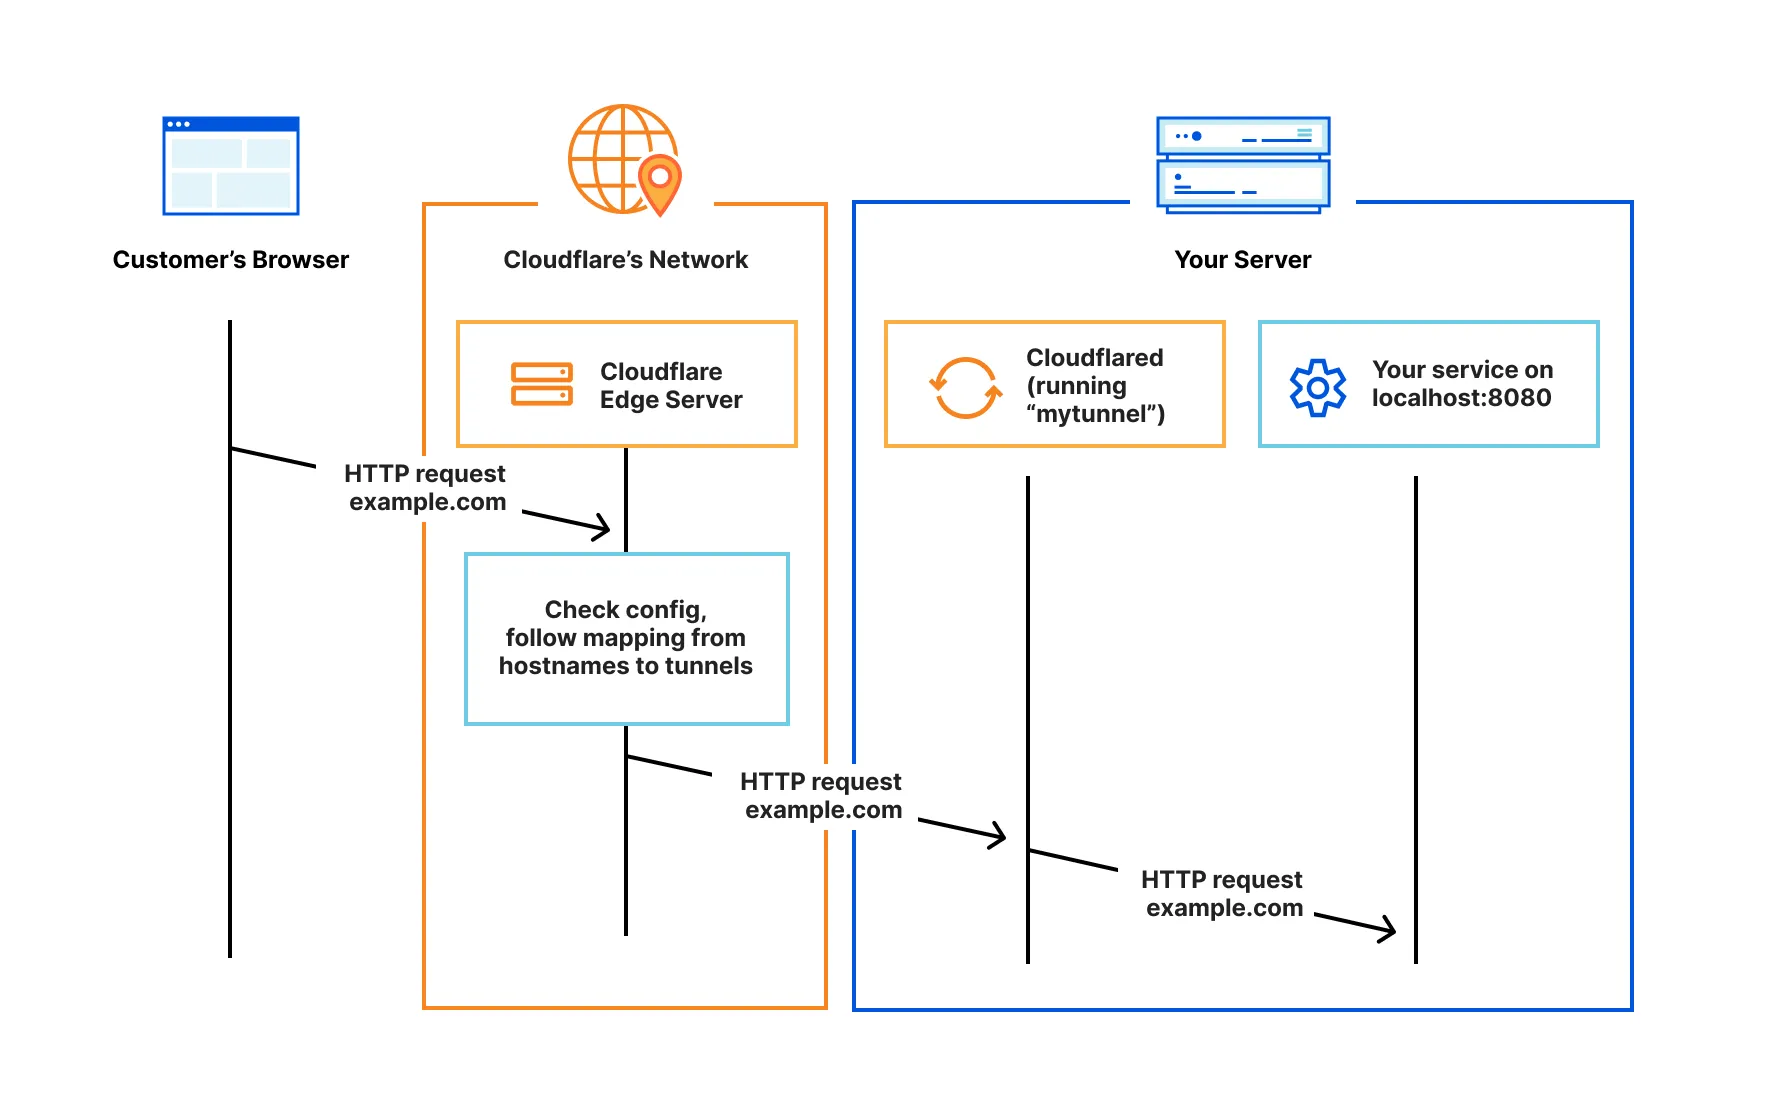
A Cloudflare Tunnel creates an outbound-only connection from your server to Cloudflare's network. No ports are opened on your router. You pair it with Cloudflare Access to add authentication in front of your application, so only users who pass your access policy can reach it. The result is a public URL like https://immich.yourdomain.com that works in any browser, protected by an authentication layer before Immich is ever reached.
Cloudflare Tunnel has a generous free tier that is suited well for self-hosting applications:
- Up to 50 users
- No explicit limit on the number of devices
- No published SLA
- Cloudflare uses the free tier as a way to beta-test new software
- Advanced enterprise controls and support tiers require paid plans
A Cloudflare Tunnel will work great with your web browser, but when you try to use the Immich app, it will say "Server not reachable". This is because the app can't natively handle the login flow. There are workarounds to fix it, like creating service tokens, however it is a little annoying to have to copy secret keys to your phone.
Worse, there is an additional, and quite serious, limitation that causes real problems for Immich. A Cloudflare tunnel works at layer 7, which means there is an upper limit to the allowed request size. On the Free plan, requests are capped at 100 MB1. This is standard for any HTTP proxy, but what it means for Immich is that it caps the largest file you can upload.
This is an Immich limitation rather than a Cloudflare limitation, and there is a long-standing feature request to make Immich support splitting large files into smaller chunks. Implementing this feature has turned out to be quite difficult, especially because we want to have a single API that will need to be supported by all clients. We have made several attempts but so far the limitation seems to be on the iOS side. For now, Immich uploads need to be one POST request per uploaded file.
Paid plans have higher limits (for example, Business is commonly 200 MB and Enterprise 500 MB+), but the argument still stands.
As soon as you have a large enough video file (very easy with a modern phone), it cannot be backed up via a Cloudflare tunnel. There are some workarounds supported by Immich, like switching to a local hostname when on a specific Wi-Fi network, but in my opinion this is more of a hack that does not work well enough to be usable. Just imagine being on a trip with no way to back up that awesome video you shot until you get home. That is not a working backup solution, I'd prefer WireGuard or Tailscale!
Anyway, let's list the pros and cons of using a Cloudflare tunnel for access:
Pros:
- Gives a public URL for accessing Immich
- High security, only authenticated users can access
- No device enrolment needed whether local or remote
- Works even behind CGNAT and does not require port forwarding nor a local reverse proxy
- Generous free tier up to 50 users
Cons:
- 100 MB request cap: Backups fail for large videos
- You need to trust Cloudflare as a third-party service
- Somewhat more complicated initial setup though most of it is point-and-click in a web dashboard
- Complicated service token needed for every mobile device
- Not open-source
There is another consideration that applies. TLS traffic is decrypted at the cloudflare end and then sent to your Immich server via cloudflared. This means that Cloudflare is able to read all data in plain text, including your photos and videos.
Bottom line: While there are many things to like about this solution, the upload size limitation kills it.
Cloudflare One: The best way to access Immich
You are still reading? This is a long article already and I've only walked you through the background up to this point. But it will be worth it since the payoff is coming now in the form of a secure, scalable solution that in my opinion allows the best of both worlds: Cloudflare One.
Here, we leverage several parts of the Cloudflare ecosystem, including the aforementioned Cloudflare Tunnel but add on the Cloudflare One Agent2 on mobile devices that will use the Immich app. By configuring a split tunnel in the Cloudflare dashboard we let enrolled mobile devices connect to Immich at the Transport, or TCP, level instead of the HTTP layer. This allows us to bypass the Cloudflare HTTP proxy limitation of 100 MB per request.
Formerly known as the WARP agent.
You can still access Immich on any device anywhere by going to the Immich URL and logging in via your configured identity provider, no need for per-device enrolment when you just want to browse. The Cloudflare One Agent is only needed for devices uploading photos and videos through the Immich app. Just like with the Cloudflare Tunnel, we can apply fine-grained security policies available through the Cloudflare Zero Trust dashboard.

Why this combination is the best option:
- Highly secure: Only authenticated users are allowed in to specifically the Immich app, not the entire network
- A public URL accessible from anywhere with built-in TLS management.
- The public web interface works in any browser with no client software.
- Mobile devices enrolled with the Cloudflare One Agent can connect their Immich app to the public URL without further configuration, and large video files can be uploaded.
- Supports multiple authentication methods from one-time PIN codes to self-hosted auth systems and cloud authentication
- Generous free tier with up to 50 users should fit almost everybody
- Works through CGNAT
The drawback is a more complicated initial setup, but that is a one-time thing. Whenever you want to enroll a new device you just install the agent and perform the login there.
Other drawbacks are
- You still have to trust Cloudflare, a third party, that decrypts your https traffic
- It is not an open-source solution
- I've heard that the Cloudflare One Agent can draw a lot of battery
Setup Guide: Cloudflare Tunnel + Cloudflare One Agent for Immich
As before, I will assume
- A working Immich setup accessible at
http://192.168.1.10:2283 - A domain name,
yourdomain.com, managed by Cloudflare DNS. This is required because Cloudflare Tunnel automatically creates DNS records for your public hostname, and Cloudflare Access needs the domain to be proxied through Cloudflare. If your domain is hosted elsewhere, you would need to transfer DNS to Cloudflare first, or at minimum delegate the subdomain you want to use. If you want to test whether a Cloudflare Tunnel works with your server before moving your DNS, you can try a Quick Tunnel which gives you a temporary*.trycloudflare.comURL with no account needed. Quick Tunnels don't support Access policies or private network routes, so they can't be used for the full setup described here, but they are a good way to verify thatcloudflaredworks in your environment. - A local reverse proxy setup with IP address
192.168.1.11with a TLS certificate, servinghttps://immich.yourdomain.com - A free-tier Cloudflare account
Yes, you will need both a local reverse proxy and a cloudflare tunnel for this configuration. This is because mobile devices will go through the Cloudflare One Agent and connect to the reverse proxy while all other devices will use the Cloudflare Tunnel.
Create a Cloudflare One organization
For the Cloudflare One agent to work, you need to create a free Cloudflare One Organization account if you haven't already.
- Go to the Cloudflare dashboard
- Select your Cloudflare account
- Choose a team name. This must be globally unique. You can change it later, but once a name is released it can never be reused by any account, so pick something you'll like. Write this down as you will need it later in the guide.
- Select the Free plan and complete setup
Enforce authentication
I have to let you know about a brand new, yet-undocumented feature in Cloudflare Access that you should enable before anything else. In the Cloudflare dashboard, go to Access controls > Access Settings and enable Require Cloudflare Access Protection. With this enabled, traffic will require an active Cloudflare Access application or an explicit exemption to pass, otherwise it will be blocked. This is great so you don't accidentally expose a route you did not intend to.
Create the Cloudflare Tunnel
- In the Zero Trust dashboard, go to Networks > Connectors > Cloudflare Tunnels
- Select Create a tunnel
- Choose Cloudflared as the connector type, then select Next
- Give the tunnel a name, e.g.
immich - Follow the on-screen instructions to install and run
cloudflaredon your server. The dashboard will confirm when the connector is healthy.
Add a public hostname for the web interface
- In the tunnel configuration, click the Published application routes tab
- Select Add a published application route
- Fill in:
- Subdomain:
immich(or whatever you prefer) - Domain: select your domain, i.e.
yourdomain.comfrom the dropdown - Service type:
HTTP - Service URL:
192.168.1.10:2283
- Subdomain:
- Select Save hostname
Note that we select HTTP above since cloudflared connects to your Immich instance directly without going through the reverse proxy.
Add Cloudflare Access for authentication
The tunnel is now active but there is no authentication enabled. If you enabled Require Cloudflare Access Protection above, don't worry, it will deny all unauthenticated requests.
- In the Cloudflare Dashboard, go to Access controls > Applications.
- Select Add an application, then choose Self-hosted.
- Enter a name for the application, for example
Immich. - In Session Duration, choose how long a login session stays valid before the user must re-authenticate. 24 hours is a good starting point.
- Select Add public hostname.
- In the Domain dropdown, select your domain (
yourdomain.com). In Subdomain, enterimmich(or whatever you chose). - Under Access Policies, select Add a policy. Give it a name such as
Allow my users.- Set Action to Allow.
- Under Include, add a rule with Selector: Emails ending in and enter your email domain, e.g.
@yourdomain.com. If you just want to allow specific addresses, use the Email selector instead.
- Select Save policy, then select Next.
- Under Authentication, select the authentication method you want to use. You can use an existing authentication system, either self-hosted (for example Authentik, Keycloak, or Authelia) or cloud-based (for example Google, Microsoft Entra ID, or GitHub). For testing purposes you can also use a simple one-time pin sent to your email.
- Select Next, Next again and then Save.
The tunnel is now protected by Cloudflare Access. Go to https://immich.yourdomain.com in your browser and verify that you are required to login, and that you can reach Immich when that is done. This concludes the first step of the guide, now we move on to the mobile application.
Connect the Cloudflare One agent to your local reverse proxy
This is the step where we allow enrolled mobile devices to access your TLS-secured reverse proxy directly over TCP without going through the Cloudflare HTTP proxy, allowing direct access and large uploads.
- Still in the tunnel configuration, go to the Private Networks tab
- Select Add a private network
- In the CIDR field, enter the private IP of your server in CIDR format:
192.168.1.11/32 - Select Save
After this step, devices enrolled with the One Agent will be able to access the specified host.
Note that we specify the address with a /32, meaning we only allow access to the local reverse proxy, not the entire network.
Configure Split Tunnels
Now, we configure the Cloudflare One Agent to route this IP address back to the local reverse proxy on the network. Here, I will show you how to use the Include method where we only route the given addresses and not all your other traffic. If you instead want to route all mobile traffic through the Cloudflare network, keep the default Exclude mode instead.
- In the Zero Trust dashboard, go to Team & Resources > Devices > Device profiles > General profiles
- Locate the Default profile and select Configure
- Scroll down to Split Tunnels. The default mode is Exclude IPs and domains.
- Under Split Tunnels, switch the mode to Include IPs and Domains and acknowledge the warning about the immediate change
- Select Manage next to Split Tunnels
- Select Add a route, enter your local reverse proxy IP in CIDR notation (
192.168.1.11/32), and save it - Select Save
After this step, devices enrolled with the Cloudflare One Agent will automatically route traffic to 192.168.1.11 through the tunnel back to your reverse proxy, wherever you are.
Add a DNS override policy
There is one more piece to the puzzle. When an enrolled device resolves immich.yourdomain.com, it will normally get the public Cloudflare Tunnel IP, which would route the request through the HTTP proxy and hit the 100 MB upload limit. We need enrolled devices to resolve immich.yourdomain.com to the private IP of the reverse proxy instead, so that the traffic goes through the split tunnel route we just configured.
- In the Zero Trust dashboard, go to Traffic policies > Firewall Policies
- Under DNS policies, select Add a policy
- Name it something descriptive, e.g.
Resolve Immich to local reverse proxy - Under Traffic, set:
- Selector:
Host - Operator:
is - Value:
immich.yourdomain.com
- Selector:
- Set the Action to Override
- In the override configuration, enter
192.168.1.11as the override IP address - Select Save policy
With this policy in place, any DNS query for immich.yourdomain.com from an enrolled device will resolve to 192.168.1.11 instead of the public tunnel address. Combined with the split tunnel route, this means the Immich app will connect directly to your local reverse proxy over TCP, bypassing the Cloudflare HTTP proxy entirely.
Device enrollment permissions
- In the Zero Trust dashboard, go to Team & Resources > Devices > Device profiles > Management
- Under Device enrollment, select Manage
- In the Policies tab, add an Include rule. For a personal setup, the simplest option is:
- Rule type: Include
- Selector: Emails ending in → enter your email domain, or use Everyone if you want to allow any email address to enroll
- In the Login methods tab, ensure One-time PIN is enabled. This lets you authenticate via email with no external identity provider required
- Select Save
Enroll mobile devices
Now that the Cloudflare One configuration is finished we will enroll our mobile devices. The app is called Cloudflare One Agent on both Android and iOS. There is another Cloudflare app called 1.1.1.1, but that's not what we want today.
- Install Cloudflare One Agent from the Google Play Store or App Store and open the app.
- Tap the hamburger menu (three lines) in the top-left corner (Android) or the menu icon in the top-left (iOS)
- Tap Account > Login with Cloudflare Zero Trust
- Enter your Cloudflare One team name (the one you chose earlier), then tap Continue
- A browser window will open. Log in with the method you chose when setting up Cloudflare Access.
- The app will return to the foreground. Toggle the connection on.
The Cloudflare One Agent is now active.
It's working!
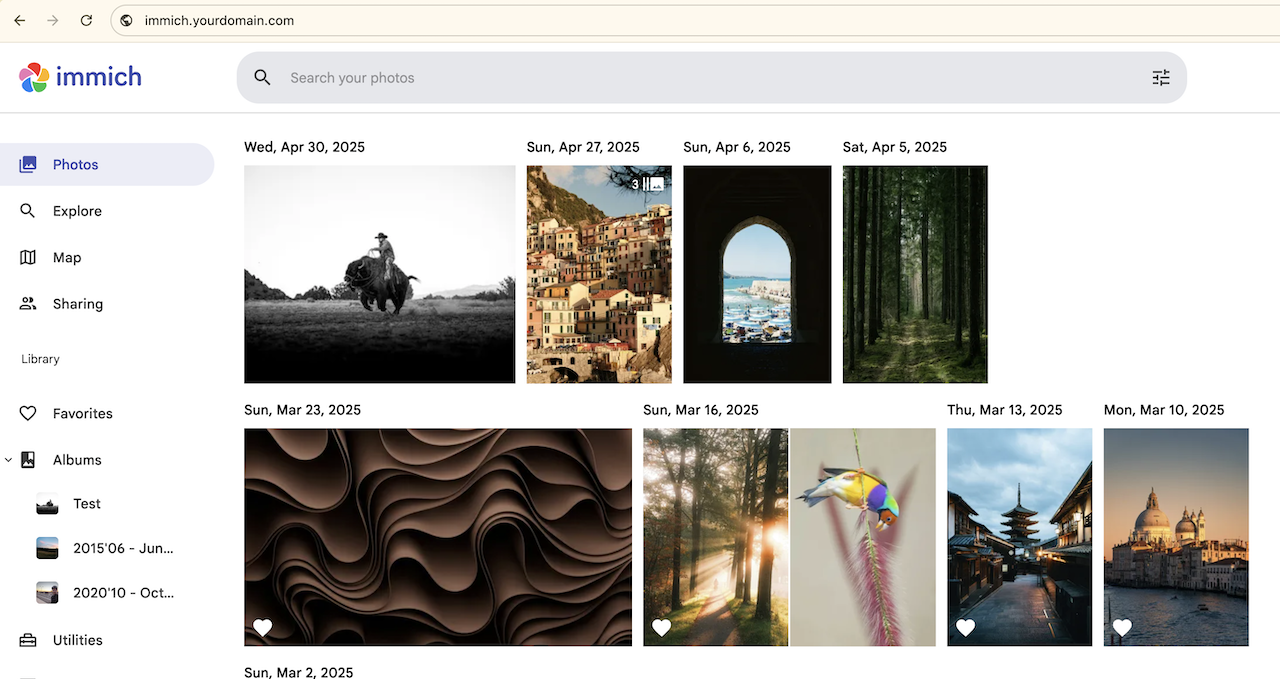
Let's check if the setup works. On your enrolled mobile device, open the Immich app. It will ask for the Server URL, so enter https://immich.yourdomain.com and click next. If you get to the Immich login screen, it means that Immich was able to connect and that you are connected through Cloudflare One. Enter your login credentials and you should see your timeline of photos and videos.
Finally, validate that you are able to upload large files. Try recording a video, check that it is larger than 100 MB, and then open Immich again. If the backup inside Immich completes and uploads that video to the server it means you are done. Congratulations, you now have an awesome way to access Immich!
You can then try disabling the Cloudflare One Agent and go back to the app, it should now show an error. Before re-enabling the agent, open your web browser, go to https://immich.yourdomain.com and login if needed. You should still be able to view the Immich web view this way without the agent running.
At this point I'd suggest turning off Wi-Fi and doing some more tests using only mobile data which will ensure you've got connectivity outside of your home.
Troubleshooting
If you are anything like me, you'll likely have to do some troubleshooting to get it all working.
Testing HTTP connectivity from your Android device
Debugging networking issues on Android is quite primitive compared to what you are used to on a desktop. My go-to tool ended up being HTTP Request Sender, a very basic Android app that lets you send HTTP requests and inspect the response. It is not pretty, but it did the job. Point it at https://192.168.1.11 with the agent on and then off, and you can immediately see whether the split tunnel is routing traffic through correctly. It will also act like a simple DNS debugger since it shows the IP address.
I've also heard that you can get curl on Android by installing Termux and running pkg install curl, which would give you the full flexibility of the command line, though I haven't tried this myself.
Beware of DNS tester apps. Most of them bypass the system resolver and query public DNS directly, meaning they ignore the Cloudflare One Agent entirely and give misleading results.
In-app diagnostics in the Cloudflare One Agent
Whenever you make changes to the Cloudflare configuration you need to refresh the mobile app configuration by opening the Cloudflare One agent and turn the proxy off and on again.
The Agent has a built-in troubleshooting section. Open the app, tap the menu, and look for the Troubleshooting section. From there you can access:
- DNS logs: shows every DNS query the agent has seen and whether it was resolved locally or sent upstream. This is the first place to check if a hostname is not resolving as expected.
- Connection status: a quick health check that shows whether the agent is connected to Cloudflare and whether traffic is being routed through the tunnel.
Searching the DNS logs for your server's hostname or IP address is usually enough to diagnose most routing problems.
Logs in the Cloudflare dashboard
The dashboard at dash.cloudflare.com gives you server-side visibility across all three traffic layers. Go to Insights > Logs and choose the relevant log type:
- Access authentication logs (Insights > Logs > Access): shows every login attempt to your Cloudflare Access-protected application, including the identity, timestamp, and whether it was allowed or denied. Useful for confirming that a user has authenticated and that the session is valid.
- Gateway DNS logs (Insights > Logs > Gateway > DNS): shows every DNS query made by enrolled devices. If a device with the agent enabled is failing to reach your server, check here to see whether the hostname is being queried and what IP it is resolving to.
- Gateway HTTP logs (Insights > Logs > Gateway > HTTP): shows HTTP requests passing through the Cloudflare proxy. This covers traffic going through the tunnel's public hostname (the web interface). If a browser login is failing, look here for the HTTP status code and the URL that was requested.
- Gateway Network logs (Insights > Logs > Gateway > Network): shows TCP sessions routed through the One Agent's private network path. When an enrolled mobile device connects to the reverse proxy IP, the session should appear here. If it does not, the split tunnel route has not been configured correctly.
Note that on the free plan, all log types are retained for only 24 hours, so check them promptly when you are debugging a problem.
Known issues
If you open the Immich app with the Cloudflare One Agent disabled, Immich will log you out. It doesn't matter if you re-enable the agent, the app will remain logged out until you log back in. I suspect that the Immich app treats the lost connection as a session failure and clears the login.
I've also noticed that Google Cast stops working with this setup. I have no solution for this right now, maybe we can find a fix for this soon.
Next steps
The Cloudflare One Agent is not limited to mobile devices. You can install it on your computer as well, which is useful if you want to upload photos from your desktop. The agent is available for Windows, Linux, macOS, and others.
One scenario where this is particularly handy is importing a Google Takeout archive. If you have ever exported your Google Photos library, you know the result is a collection of ZIP files that can be hundreds of gigabytes in total. immich-go is an excellent tool for uploading these archives directly into Immich. With the Cloudflare One Agent running on your desktop, immich-go can connect to your Immich server via the private network route, meaning the 100 MB upload limit that affects the tunnel does not apply. This makes bulk imports of large photo and video libraries practical even when you are not on the same local network as your server.
Beyond this guide, have fun! Cloudflare offers a lot of cool things to explore now that you have the basic setup going. Why not make an overkill homelab that enforces device posture checks? How about setting up DEX synthetic tests to continuously monitor the availability of your self-hosted apps (up to 10 tests included in the free tier)?
There are more in-depth guides on YouTube on hardening your Cloudflare Tunnels even further, like this one:
Final words
In this article we reviewed six ways to access Immich remotely: plain HTTP, a local reverse proxy, port forwarding, WireGuard, Tailscale, and a Cloudflare Tunnel. Each has trade-offs. Port forwarding exposes your server to the internet. WireGuard is secure but tedious to manage at scale. Tailscale has excellent access controls and is easy to set up, but its free tier is limited to three six users. A plain Cloudflare Tunnel gives you browser-based access without opening ports, but breaks on video uploads larger than 100 MB.
The setup we built uses the Cloudflare One platform which includes both a Cloudflare Tunnel and a Cloudflare One Agent. The web interface is protected by Cloudflare Access, and the mobile app connects directly to your local reverse proxy over a private network route, bypassing the upload size limit entirely. All of it runs on the Cloudflare free tier. This is possibly the best way to access Immich today.
I've had a lot of fun exploring this topic, and I'm happy to have this article as the inaugural post on my blog. If you have questions, suggestions, or just want to continue the discussion, find me on Twitter or in the Immich Discord. And if you enjoy Immich as much as I do, consider becoming a supporter to help the project keep going.
Acknowledgements
Thank you to Alex and the rest of the Immich team for welcoming me into the project and for building something truly worth self-hosting. Thanks to my friends and colleagues for proofreading this article. And finally, thank you to my family for their patience every time our self-hosted apps broke once again because I couldn't stop tinkering.